

In the vibrant world of 3D printing, one thing unites creators of all experience levels: the quest for beautiful, functional, and professional-looking parts. While today’s desktop machines are capable of impressive feats, layer lines and rough surfaces remain telltale signs of the additive process—often limiting both application and aesthetic.
Enter vapor smoothing, a transformative post-processing technique that promises glossy, injection-molded-like finishes along with cleaner surfaces and, in some cases, improved durability.

Get Instant 3D Printing Quotes + 10% Off
This guide explains what vapor smoothing is, why some materials respond while others don’t, how to run the process safely, and how hobbyists and professionals alike can achieve repeatable, showpiece results.
What Is Vapor Smoothing?
Vapor smoothing, sometimes called vapor polishing or chemical smoothing, is a surface treatment used to make 3D printed plastic parts look and feel dramatically smoother by exposing them to solvent vapors. The solvent softens only a thin outer layer, which self-levels to eliminate visible layer lines.
Unlike sanding or tumbling, vapor smoothing doesn’t abrade away material or significantly alter part geometry. The result is a glossy, even finish that can rival injection-molded plastics.
The method originated in industrial plastic finishing and gained popularity in 3D printing due to compatibility with materials like ABS, ASA, and HIPS. It’s valuable for display-ready prototypes and for functional parts that benefit from lower friction, sealed surfaces, or easier cleaning.
How Vapor Smoothing Works: The Science Made Simple
FDM prints are formed by stacked beads of molten polymer, leaving a surface of micro-grooves and filament seams. These irregularities are especially visible on curved surfaces or at lower print resolutions.
When an appropriate solvent vapor (for example, acetone for ABS) contacts the surface, it temporarily softens the outermost polymer layer. Surface tension then allows that thin layer to flow and self-level, fusing boundaries and erasing peaks and valleys.
As the vapor dissipates, the surface resolidifies into a continuous skin. This not only boosts smoothness and gloss but can also seal micro-porosity, improve impact resistance slightly, and enhance color depth.
Ideal 3D Printing Materials for Vapor Smoothing
Not every filament responds to solvent vapor. Success depends on pairing the material with a solvent that can partially dissolve or aggressively interact with that polymer’s chemistry.
Best Candidates
- ABS (Acrylonitrile Butadiene Styrene): Highly responsive to acetone vapor.
- ASA (Acrylic Styrene Acrylonitrile): Smooths with MEK or acetone.
- HIPS (High Impact Polystyrene): Smooths with limonene.
- PMMA (Acrylic): Smooths using chloroform (industrial settings).
- Polycarbonate (PC): Requires dichloromethane or similar—advanced lab use only.
Materials Not Recommended
- PLA: Resistant to common solvents; attempts often damage the part.
- PETG, Nylon, TPU: Minimally affected by vapor and prone to degradation.
- Resin (SLA/DLP): Generally incompatible with standard vapor smoothing; rely on polishing or coatings instead.
The Vapor Smoothing Process Explained: Step-by-Step
1. Preparation of the 3D Printed Part
- Clean: Remove dust, oils, and all support remnants.
- Dry: Ensure no residual moisture; dry the part if needed.
- Refine minimally: Light trimming is fine; avoid heavy sanding that can trap debris.
2. Choosing the Right Solvent
- Acetone: Go-to for ABS and many styrene-based filaments.
- Methyl Ethyl Ketone (MEK): Stronger alternative, sometimes preferred for ASA.
- Limonene: Effective for HIPS smoothing.
- Chloroform/Dichloromethane: For PMMA/PC—requires rigorous lab-grade precautions.
- Caution: Many solvents are toxic and flammable—use proper PPE and ventilation.
3. Building a Vapor Smoothing Chamber
Create a sealed space where vapor can contact the part evenly without pooling liquid on the surface.
- Use a sealed glass, metal, or acrylic container sized for the part.
- Elevate the part above the solvent source on a platform or mesh.
- Charge the chamber with solvent via towel/sponge/tray—keep liquid off the part.
- Prevent the part from touching chamber walls.
- Keep the chamber sealed during exposure to contain vapors and odors.
4. Generating and Controlling the Vapor
Place a measured quantity of solvent on an absorbent (towel/sponge) or in a shallow tray at the bottom of the chamber, insert the elevated part, and seal the lid. Exposure typically ranges from 5–30 minutes depending on temperature, humidity, solvent, and desired finish.
Warming the chamber slightly (well below any solvent flash point) can promote even vaporization. Some advanced vapor smoothing systems add gentle heat and controlled airflow for consistent, repeatable results.
- Start with short exposures (5–10 minutes), then increase as needed.
- Avoid direct liquid contact with the part to prevent melting or deformation.
- Do not overheat; never use ignition sources near solvent vapor.
5. Monitoring and Removing the Part
- Watch for a uniform, glossy sheen through the chamber walls.
- Once the finish is achieved, vent the chamber outdoors or under extraction.
- Do not touch the softened surface; let the part air-dry 30–60 minutes.
- Full hardening and off-gassing may take several hours; gentle warm, ventilated curing can help.
Safety Essentials: Vapor Smoothing Done Right
Solvent vapors are hazardous. Protect your health and workspace with robust safety practices.
- Work only outdoors or in a well-ventilated area with active fume extraction.
- Wear safety goggles and chemical-resistant (nitrile) gloves; avoid skin contact.
- Store solvents in fireproof, tightly sealed containers away from heat or sparks.
- Never use open flames, heat guns, or unapproved heaters near solvent vapors.
- Dispose of solvent-soaked towels and rags in sealed metal containers—never toss indoors.
- Keep children, pets, and bystanders away during smoothing operations.
- If you feel dizziness, headaches, or irritation, stop immediately and get fresh air.
- Professional machines include ventilation, heating safeguards, and interlocks—follow the manufacturer’s instructions.
Pro Tips for Flawless Vapor Smoothing Results
- Don’t overdo exposure: long times can round edges, blur text, or cause sagging.
- Use multiple short sessions with full cooling between for greater control.
- Mask areas (tape, foil, printed shields) to keep select regions matte or textured.
- Expect color shifts on some filaments—test scraps first, especially whites and lights.
- For painting, allow at least 24 hours after smoothing before primer or decals.
- Smoothing can improve airtightness/watertightness for functional parts.
Professional Vapor Smoothing Equipment: Should You Invest?
DIY chambers satisfy many hobby needs, but labs and manufacturers often require repeatability, throughput, and regulatory compliance that dedicated machines provide.
Examples
- Polymaker Polysher: Polishes PolySmooth filament using isopropyl alcohol vapor (not for ABS/ASA).
- PostProcess Technologies and DyeMansion Powerfuse S: Industrial solutions with heated/controlled chambers, programmable cycles, solvent recirculation, and safety systems.
Benefits
- Consistent, repeatable finishes with less scrap and guesswork.
- Improved operator safety via sealed loading and filtration.
- Batch processing increases throughput for production environments.
Real-World Use Cases: Vapor Smoothing Applications
- Consumer electronics enclosures for DIY, IoT, and robotics look professional and clean more easily.
- Engineering prototypes gain a production-like appearance for client demos and marketing.
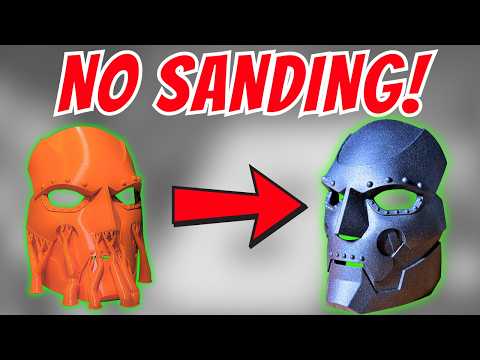
- Art and cosplay builds—helmets, jewelry, props—achieve a glassy, paint-ready surface.
- Medical tools and assistive devices benefit from smoother, more hygienic surfaces.
- Watertight containers and housings: sealing micro-pores improves leak resistance, especially for ABS-based projects.
Video: Vapor Smoothing Demonstration
The Science and Engineering of Surface Quality: Vapor Smoothing’s Added Benefits
- Enhanced impact resistance by closing micro-cracks and creating a tougher surface skin.
- Improved UV and chemical resistance thanks to a denser, less porous outer layer.
- Reduced friction for moving mechanisms due to lower surface roughness.
- Easier cleaning and sterilization—detergents, disinfectants, and UV work better on less porous surfaces.
Limitations and Considerations
- Size constraints: your chamber (or machine) must fit the largest intended part.
- Geometry sensitivity: tall, thin, or ultra-fine features can deform if overexposed.
- Detail softening: fine textures or small text may blur—account for this at design/print time.
- Possible color shifts: aggressive or prolonged exposure can dull or yellow some pigments.
Troubleshooting Common Vapor Smoothing Problems
- Uneven gloss: exposure was inconsistent—rotate parts or improve internal airflow.
- Surface bubbling: excess solvent or elevated temperature—reduce exposure and dry gently.
- Sticky/tacky finish: insufficient curing—allow more ventilation and time; add gentle warmth.
- Warping/sagging: overexposure or heat—shorten exposure and avoid heating beyond room temperature.
The Future of Vapor Smoothing in 3D Printing
- Bio-based, lower-toxicity solvents under active development.
- Broader material compatibility research (e.g., PLA, PETG, flexible filaments).
- Automation for additive factories: batch handling, rotation, and inline finishing.
- Standards and certifications for regulated industries to ensure safety and repeatability.
Need Production-Grade 3D Printing Support?
Get expert help with material selection, manufacturability, and high-precision parts without the trial-and-error of tuning everything in-house.
Conclusion
Vapor smoothing bridges the gap between maker roughness and production polish. With the right materials, solvents, and safety practices, you can turn printed parts into glossy, durable, and easy-to-clean components suitable for display or function. Start small, document your parameters, and iterate—your prints will look and perform better with each controlled session.

